Kangaroo Paw Fern: Info, Care and Problem Guide
The Kangaroo Fern Houseplant
Going by the names Kangaroo Fern, Kangaroo Paw, or Hound’s tongue it's a charming houseplant and one of the simplest and easy going ferns to grow as an indoor plant.
The leaves emerge from creeping thin dark green rhizomes, which have a slightly hairy texture. They look more like typical stems than the rhizomes you see on most ferns. The fronds are leaf-like with a glossy finish and the stems are darker, adding a nice contrast.

Sometimes known as the Kangaroo Foot Fern, the fronds have a glossy shine.
It goes by several botanical names, including Microsorum diversifolium and Microsorum pustulatum. Technically this covers two different species, but they look so similar and grow in the same way they're both known as the "Kangaroo Fern".
This common name comes from the shape of the leaves, which look like a kangaroo foot, fitting as the plant grows natively in New Zealand and in some parts of Australia.
How do you pronounce Microsorum correctly? Say:
my-kroh-SOR-um
You may also see it labeled as Zealandia pustulata. This is a new Genus that was started in 2019 and there is some debate as to whether this plant actually belongs here. Until these debates resolve you won't get a consistently used name, so expect a little confusion, but look out for the three mentioned and you'll find it.
It can be tricky to track down if you're searching for it. Because it's a fairly common plant, it doesn't always get labeled in a garden center and can just be called "Fern" or "Foliage Plant" on the tags. It is however very distinctive so should be reasonably easy to identify if you look carefully.
My Thoughts
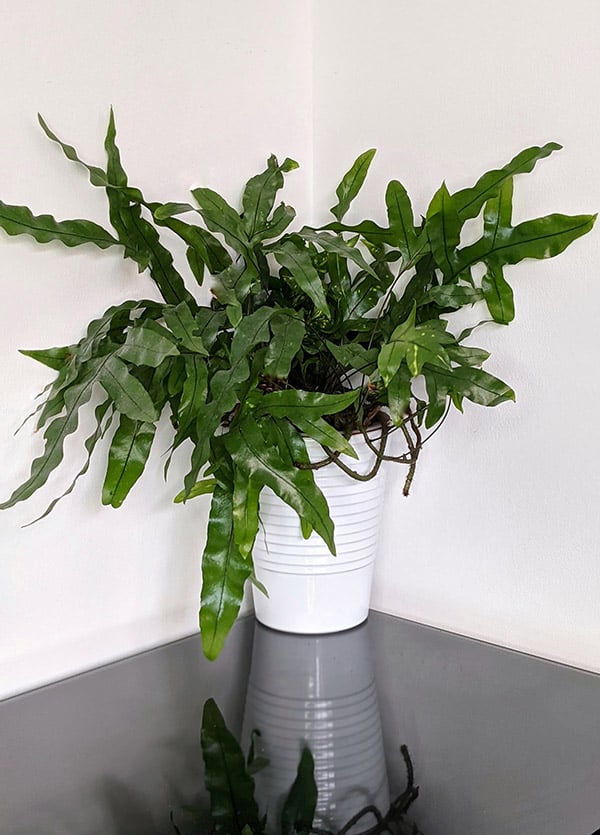
A pleasant and elegant plant when grown to a good size, especially if grown in a hanging basket. It might seem dull compared to the many other ferns out there, but it's very forgiving, grows fast, and is often cheap to buy.
So what's it like to own one? Well easy is the first word that comes to mind. Mine sits on my bedroom floor and has been there for five years. A low light spot with only a little indirect bright light from the early morning, and then it's in fairly dim light for the rest of the day.
It would grow faster in better light (and a bigger planter!) I'm sure, but it steadily produces a handful of new fronds every year and I perhaps pull off one or two gone over ones every few months and that's it.
In terms of indoor gardening, it's super simple compared to other fern species for example, I have much more maintenance and trouble with the Boston Fern and Rabbits Foot Fern.
Kangaroo Paw Fern vs Blue Star Fern
The Blue Star Fern is often confused for Kangaroo Paw Ferns and vice versa. You'll see people regularly muddled on Online groups, Facebook and Instagram.
The leaf shape is very similar so I do understand the confusion, but when compared side by side they're easy to tell apart.

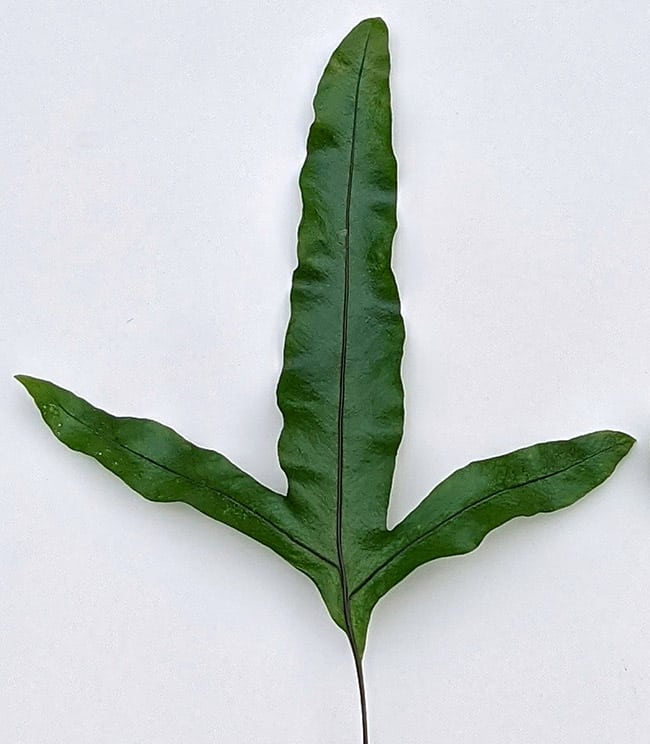
Kangaroo Paw Fern leaf (left) and Blue Star Fern leaf (right)
With a casual glance, you could think the leaves are from the same plant, but look closer, and you'll see noticeable differences. The Kangaroo Fern has an almost black stem that runs up into the leaf, whereas the blue star has a green, almost grey stem, so it blends in more.
The leaves on the Kangaroo Paw are much darker green, completely flat and have a leather like sheen. The Blue Star has slightly fuzzy leaves, and a blue tint.

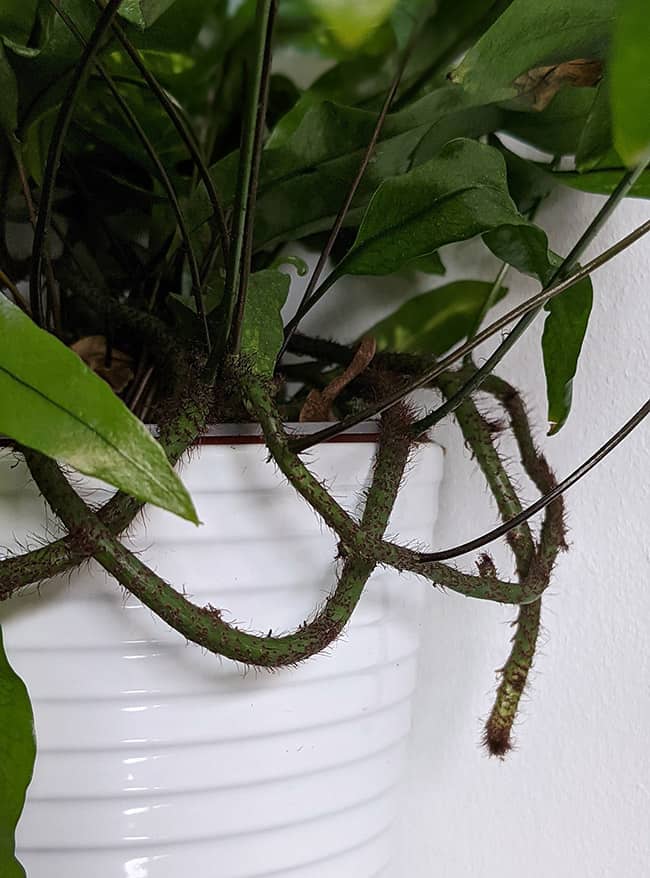
The rhizome growing on the soil surface at the base of the plant will often tell you which fern you have.
The final tell-tell sign are the aerial roots or Rhizomes that grow around the base of the plants. The Blue Star Fern has thick gold hairy rhizomes, whereas the Kangaroo Fern has dark green, much thinner and less hairy ones.
Further Reading
Hopefully, that helps you to identify what fern you have correctly. Keep scrolling for the full Kangaroo Paw Fern care guide and common problems you may come across.

Hi, I'm Tom!
If you're like me and enjoy the challenge of growing houseplants and getting them to thrive, then OurHouseplants can help. This website shares my knowledge and years of growing plants and provides my advice on properly caring for your indoor plant friends.
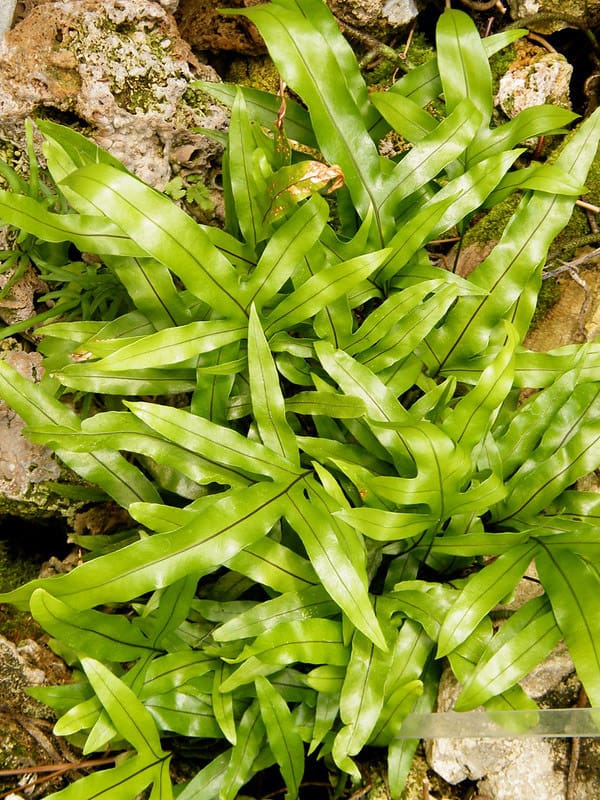
Kangaroo Fern Photos
Growing and Care Guide
Light
Earlier I mentioned mine was growing on the bedroom floor only getting bright indirect light in the early morning. Then for the rest of the day the light levels are much lower. This is fine as a minimum. You'll get growth at a slowish rate but the plant will survive and still look great.
If you want faster growth and plan to grow it to a large size over a few years, then you'll need to increase the amount of light it gets. In my example I'd have to move it closer to the window, perhaps put it on a bedside table. I could also move it into a north facing window and put it right on the windowsill.
Indirect sunlight only. It would be best if you avoided direct intense sunlight, think of where ferns typically grow (forest floors or attached to other plants, with a bit of dappled sunshine falling through the leaves).
Water
Top Tip
This fern that doesn't mind drying out fully from time to time. Don't get me wrong, it doesn't want this to happen for long periods, but the odd bit of neglect or occasional drought won't harm it.
A growing medium that's fairly moist for much of the time is what your plant really craves. They enjoy a little drying out, but as soon as the surface has dried it's fine to water it again.
How often you will need to reach for the watering can to achieve this will depend on your environmental conditions. Plants growing in bright light, warm temperatures over the peak summer months will need considerably more water than one growing in low light, cooler temperatures.
My plant in medium to low light, in it's warm spot needs watering once or twice a week during summer. Perhaps once every 10 days over Winter.

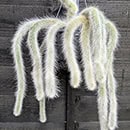
"Do you think this Kangaroo Paw Fern needs watering?" YES! This plant is extremely dehydrated look at the wrinkled, wilted and washed out leaves.
Humidity
Ferns are generally adapted for high humidity locations in your home. However the leaves on a Kangaroo Fern have a leathery feel, making them tough and better able to deal with low humidity. Meaning they can cope with most indoor environments.
So in reality, you should be able to grow your plant wherever you want. Within reason of course! You might get dry ends or brown areas on the fronds over time if you have it in a very low humidity spot. In homes, this would be in locations near open fires or above radiators. If this happens trim off the brown bits and move it.
Feeding
A general houseplant feed or one designed for ferns every few months will be plenty. They're not gross feeders and will do surprisingly well on a limited supply of nutrients. Newly repotted plants won't need any fertilizer for around 6 months.

Watch me talk about my Kangaroo Paw Fern on YouTube.
Temperature
They need a warm spot in your home for growth, but can cope with cooler temperatures easily enough. Just don't expect it to grow! 17°C (62°F) to 25°C (77°F) is ideal.
Lower temperatures than this are acceptable and your plant will keep ticking over as normal. However don't put it anywhere that would be subject to frosts as you'll find the cold can damage the foliage. So if you're growing it as an outdoor plant, move it back inside before Winter starts.
Repotting
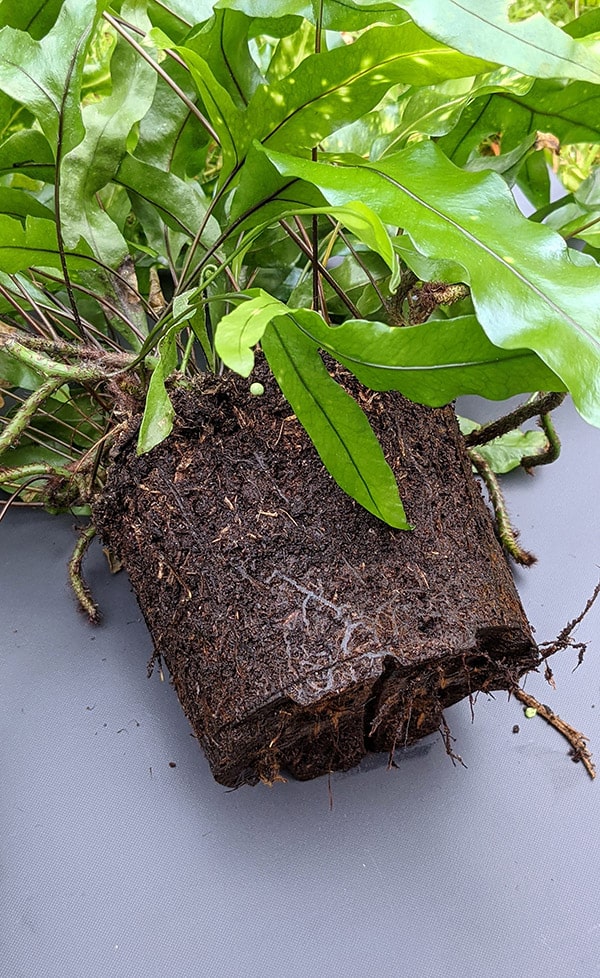
Over a fairly short time the roots on a Kangaroo Paw Fern will fully take over the container. Like completely. If you remove an established plant it's normal for all of it to come out in one go like a giant plug.
The root ball can become very compact over many years. Sometimes if your plant is no longer growing, repotting it can stimulate new growth.
This "taking over" of the soil or growing medium is pretty normal with ferns. The roots are very thin and become like a net over time. In its native habit it's an epiphyte, so this netting helps anchor it in place.
Repotting Tip
If the roots have taken over like the ones in the photo, break them up a little towards the base which will help encourage new roots to grow into the new soil.
A planter's solid design means it will stay neat and compact anyway, but your fern will still secure itself like this regardless. So a plant that looks like this is "root bound" but it's not a priority to upsize it. They like feeling secure like this, so repotting isn't usually urgent.
However when you notice your plant's no longer growing bigger (and you want it to), feel free to repot it up into a bigger container and backfill the new space with a suitable growing medium (see below).
What kind of potting soil should I use?
This fern likes rich humusy soil. This holds water well and allows the roots to easily grow through it. Peat free mixes are ideal as long as they contain a wide selection of well shredded materials. Large objects like chunks of bark will just waste space as the roots have to grow around, rather than through them.
Smaller objects like Perlite or gravel can be added if you want to improve drainage (especially important if you're known to over-water your plants!). However it doesn't need to be a high quantity.
Propagation
You can propagate your Kangaroo Fern through the spores. I've personally never tried to do this, primarily because it's easier and less time consuming to use another method which I'll explain in a second.
However if spore propagation is your thing, then when the cases have matured and start to open, you can spread the spores thinly over a container of fine potting soil.
Cover them with a clear plastic bag and put it somewhere warm with decent light. Germination can take between 3 or 4 months. So it's a slow process and can be unreliable.
The easiest way to create new plants is to remove a few inches of a rhizome to create a "cutting". It needs to have at least one frond growing from it for the best chance of it working. I've taken a photo of how your "cutting" should look.

Rhizome division like this usually has a high chance of working, especially when done in early spring or summer months.
You need to gently push the cut rhizome into a potting mix similar to what it was growing in initially. You don't have to bury it into the dirt, but it needs to make contact with the growing medium and stay in contact until roots form. If you find yours isn't stable or is wobbling too much, then pin it into place.
Put it in a bright warm location out of direct sunlight and keep the soil moist. After a few weeks it should slowly start to establish and before long you will see new fronds emerging from the rhizome. When this happens you know your attempt has worked.

You can use a variety of soil types for your cutting from the usual things to coco coir or peat free. Just ensure it's fine and well mixed.
It will take a while for your cutting to turn into a bushy and full looking plant. So it might be worth taking a few cuttings and putting them all into the same container to help get you to that final look quicker.
Speed of Growth
I'd describe the growth as steady and moderate. A few new fronds every couple of months is normal. I find if I have a warm winter I will still get the odd new fronds even then, but most of the growth seems to happen during the late Spring and over the Summer months.
Different leaf forms are normal too. As it ages they become more lobbed and detailed.
How big can it get?
In good conditions Kangaroo Paw Ferns grow at a fair pace and within 5 years you can have a drastically bigger plant to display.
Well cared for plants in a suitably large container will eventually reach almost two foot wide and tall. If this is too large for your space, then keep it in a small planter and this will restrict and pause it's growth.
Flowers
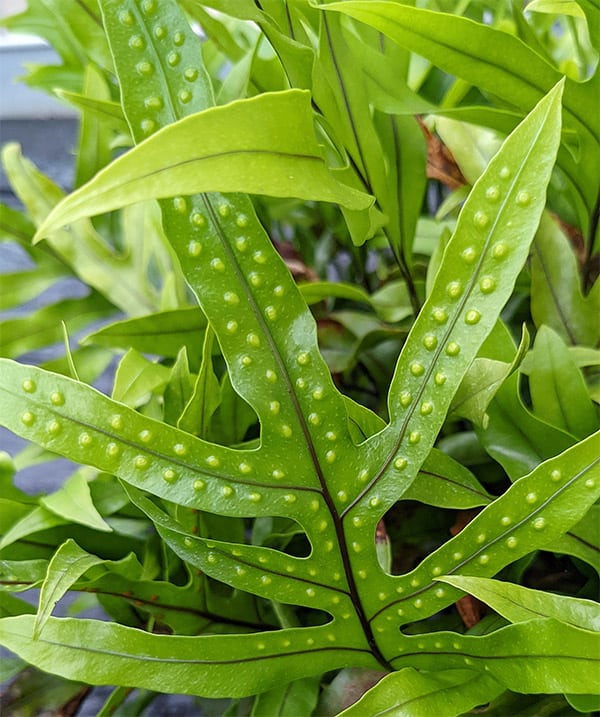
In keeping all over ferns, there are no flowers on this plant, in the traditional sense at least. With good care and a little maturity, some fronds may start to produce "spores".
These spores look like little raised bumps like the ones in the photo below. A lot of people are worried when they see them and think something is going wrong or they have a Pest infestation. Nope completely normal. They will disappear over time and you don't need to do anything about them.
The leaves of this plant are covered in round spore cases.
Is the Kangaroo Paw Fern safe around pets?
Yes, the Kangaroo Paw Fern is safe to grow around pets and people. No ill effects have been reported from eating this houseplant. Cat Friendly seal of approval.
Vegetation can of course upset the gastrointestinal tract so do deter your pets from eating your houseplants as much as possible.
Anything Else?
My main issue with this plant are the fronds becoming dull over time from dust accumulation. It's easily fixed by wiping them down with a damp cloth (they're big enough and tough enough to handle this). You can also wash it quickly by holding it under a shower head for half a minute or so.
How to Grow Recap
- Will take low Light all the way up to to some dappled full sun
Very tolerant houseplant. Needs indirect bright light for growth but will cope with some lower light spots in your home. - Medium watering needs.
Likes the potting soil to be moist, but let it dry out a little between waterings. Will also cope with fully drying out for several days if needed. - Warm temperatures.
Anything about 17°C (62°F) should be enough for your plant to grow. Lower temperatures will prevent it from growing. - Only needs sporadic or infrequent feeding.
Feeding a handful of times a year is normally sufficient. Use everyday houseplant liquid fertilizer or one designed for ferns. - Not too much sun please!
Too much sun can easily damage and burn the foliage. If you notice problems, move it back away from the window. - Avoid very cold temperatures.
They can be fairly hardy plants and may survive a light frost, however the foliage is easily damaged. It's strongly recommended to keep your plant warm all year round.
Common Problems and Issues
Brown leaf ends and brown fronds
A handful of things can cause some of the fronds to brown off. All are easily sorted out, so try not to panic.

Although this fern doesn't need consistent humidity levels, long term dry air can cause problems.
- Dry Air.
Dry and arid homes or unusually low humidity spots in your home can trigger some browning. Are you growing it above a radiator or next to an air cooling vent? If so, move your plant and that should help. - Natural Shedding.
Like any plant with mature leaves, older fronds in the center or "heart" of the fern will eventually go brown and shrivel up. Your plant may also shed any frond which is covered by others. This is normal and not a problem. - Adjusting to a new location.
Following on from the above, sometimes if you move your plant and if the leaves are perhaps pressed against something that only allows minimal light to hit these leaves, they may be "shed". You can try and prevent this by rotating the container 1/4 or so every couple of weeks.
Bumps on the fronds.
In most cases this is down to Spore Cases forming. Harmless and completely natural. If you've clicked the link and yours look like something else, it could be a pest like Scale Insects.
Yellowing fronds.
I've found this plant can cope with a fair amount of overwatering. Not ideal obviously but mistakes happen. However even then, there is a limit and yellowing fronds indicates you've been overdoing it.
Moldy leaves, soggy soil and brown spots are all other indicators of there being too much moisture swishing around the roots. Root rot is the final sign, but I've found this to be very uncommon, so unless you're a drastic over-waterer for weeks on end you shouldn't encounter this.
Cut back on the watering and make sure there is at least one drainage hole in the container to let excess water escape.
Yellow Spots / Marks.
This sort of marking could be confused for some unusual variegation. You might even think you have an incredibly rare plant on your hands! Sorry that's not it.

Even with good care, a pest problem can still become an issue on your Microsorum.
Nope your plant actually has a virus. In the majority of cases it's come from a sap sucking pest like Aphids. They can spread viruses between different plants and also fronds.
There is no "cure" but the good news is that I've found the Kangaroo Fern does a pretty decent job of isolating the virus meaning the problem is confined. So if you remove the pests it tends not to spread over the whole plant. You can leave the affected leaves where they are, or remove them.
It is however rare to see this, and most Kangaroo Paw Fern owners won't ever have to worry about it.
About the Author
Over the last 20 years, Tom has successfully owned hundreds of houseplants and is always happy to share knowledge and lend his horticulture skills to those in need. He is the leading content writer for the OurHouseplants Team.
Also on Ourhouseplants.com
GALLERY - Credit for Microsorum diversifolium in the United States Botanic Garden, Washington, D.C. Sarah Stierch