What does Root Rot look like (and how to fix it)
Root Rot and Indoor Plants
Problems with houseplants can often be fixed, but root rot can progress rapidly and often leads to the deterioration of a plant in a very short space of time.
It begins when conditions around the plant roots change, allowing fungal diseases or bacteria to quickly multiply. Essentially, at this point, the plant's roots start to rot away, and this is very bad news for almost all houseplants.
With this in mind, you need to know what root rot symptoms look like, how to treat it, and of course, how to prevent it from happening in the first place. Don't worry; I've got you, and this guide will answer all this.

Excess water can lead to wet soil and poor soil conditions in general. When this happens, root rot is normally close behind.
The only good thing about root rot symptoms is that they will usually follow a predictable pattern, and in many cases, the indoor plant, or at least parts of it, can be salvaged if you act fast enough.
It also doesn't just randomly strike healthy roots like pests might; root rot tends to occur over a prolonged period of poor growing conditions. It can be pretty devastating if you have to deal with it, but arm yourself with the knowledge I've shared below and hopefully, you'll be able to make things right.
The Signs of Root Rot
Once the process of root rot starts, symptoms will often show up quickly.
What you see or experience will vary between plants, so you're unlikely to see all of the following things. That said, if you notice any of these signs it can be a helpful learning tool in identifying root rot.
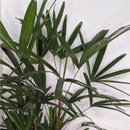
Stem Rot
Even though root rot happens to the roots, it will sometimes affect the visible parts of the plants, such as the stems. This is much more common in cacti and succulents, where problems with the roots typically have been progressing for several weeks.
Sections of the plant will become mushy or soggy. Parts might even start falling off.

This Eve's Pin Cactus (Austrocylindropuntia subulata) has a bad case of stem rot. The roots are gone, and its progressed into the base of the plant, causing the stems to literally fall off.
Stem rot is caused by a bacterial or fungus infection in the stem. In most cases, plants are resistant to this type of infection, but if they're weakened by things going on in the potting mix, then it can easily take hold.
If the roots of your succulent are fine and you just have a stem / leaf rot problem going on, then the treatment is a little different. I have a separate guide dealing with overwatered succulents suffering with leaf rot.
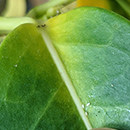
Soft Black Leaves
Black sections on a leaf which feel soft or slightly mushy is a strong sign of long term overwatering and cold temperatures.

Epipremnum pinnatum 'Variegata' with dark brown mushy leaf edges. This is a clear sign of too much water in the growing medium, creating soggy conditions.
Dark brown or black leaves can also be a symptom of sun damage, so it's important not to confuse them.
- Sun Damage.
Usually presents as random black sections which can appear over any part of the leaf. The color is more browny black and will often have a crispy feel a few days after first appearing. More common in Spring and Summer and in bright direct light locations. - Root Rot.
Usually appears at the leaf edges only. The color is very dark brown or black and has a mushy feeling that does not "dry out". More common in Autumn / Fall or Winter and in low light locations.
Yellow Leaves
Almost every houseplant will give you a yellow leaf or two every so often. Leaves don't live forever. But when you're getting lots of yellow leaves quickly, this is a strong sign something is wrong with the moisture level around the plant's roots.
It can sometimes be caused by underwatering, so you need to have a feel of the soil itself to try and work out if it's dry or wet to rule out the alternative possibility.
Leaf Drop
Like yellowing leaves, some leaf drop in certain plant species is considered normal. But if the leaf dropping is rapid, there is a problem and it could be the early stages of something worse.
On the other hand it could just be a quirk of the species. For example, Ficus plants like Fiddle Leaf Figs or the Weeping Fig will often drop leaves for something as simple as being moved. A happy Dragon Tree will shed vast numbers of leaves in the Spring and Summer. It's normal.
However, some plants shouldn't drop leaves often. There isn't a list I can give you, but generally if there are a lot of leaves falling at once there is likely to be a problem and it could be root rot.

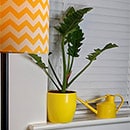
If I'm ever asked "What does root rot look like on a money tree?". I'd show them this photo! Leaves dropping, stems falling off and clear problems on the soil surface.
Wilting
When a plant wilts it's almost always underwatering. But if root rot has progressed and most of the roots are no longer functioning or absorbing water to take up to the leaves it can trigger extreme wilting.
I've seen it frequently happen in Poinsettia, African Violets and Calathea plants. In all cases, when I arrived with my watering can, it was apparent the soil was already holding excess moisture and more water wasn't the answer.
How the Growing Medium looks
Fundamentally, it's excessive moisture in the growing medium that causes the roots to rot off. The condition of the potting mix can indicate that things are going wrong or are about to.
Fungus Gnats flying around, obvious soggy or wet conditions in the soil or patches of white mold growing on the surface are all signs of a pending problem.
By themselves, this does not indicate root rot is happening. But it could be seen as an early warning sign and if it's combined with any of the other symptoms I've mentioned already, it's time to inspect the roots for a fungal infection.
Rotten Roots
Every single sign mentioned above could be root rot, or it might be something else. There is only one way to know for sure: check the roots.
Pull the entire plant carefully out of its pot or container and then see if anything ticks the checklist below. If it doesn't, then congrats, you probably have a healthy plant.
However if anything is a match, then you have a degree of root rot that needs taking care of.
- Brown or black mushy roots.
- Unpleasant smell.
- Roots which fall apart or fall away from the root ball.

This photo shows root rot in progress. Some of the roots are a healthy light green and look firm. Others are clearly brown, black and mushy indicating a problem that needs resolving.
I often get asked if there is a way to check the roots without removing the root ball from the existing container. Realistically, there isn't. Root rot often starts in the deep central parts of the root ball, rarely on the surface or in an area you can see or feel with your fingers.
Even if you can see something, you won't know how bad it is or what treatment option you need to adopt. So get in there and have a look.
Next, we're going to take a look at how you can fix root rot when you know your plant has it.

Hi, I'm Tom!
If you're like me and enjoy the challenge of growing houseplants and getting them to thrive, then OurHouseplants can help. This website shares my knowledge and years of growing plants and provides my advice on properly caring for your indoor plant friends.
How to Fix Root Rot
In most instances, you can have a go at fixing the root rot problem. It doesn't always work and ultimately will depend on how advanced the problem is. The more healthy roots you have, the better your chance of saving the plant.
There is no official scale of what's classed as "bad", but for this article's purposes, I'll rank it as either minor, moderate or severe. Work out which level your plant falls into and then a little further down, I'll give you some suggestions about what to do next.
So to work out the severity of the problem, look at the roots on your plant and judge, using a rough percentage, how many have gone rotten, then check the scale below.
"Minor"
"Moderate"
"Severe"
For example, if you think that around half (50%) of the roots are damaged or rotted then it would fall into a moderate level of root rot.
Fixing a Minor Level of Root Rot
If around 20% or less of the roots are rotted, then we'd classify this as minor root rot. The good news is you've caught the problem early and your plant has a good chance of fully recovering.
Basically, all you want to do here is some cleaning up. Trim off as many of the decaying roots as you can with a pair of scissors.
If there is any damage to the foliage, like soft stems or black leaves, then trim those off too. The mushy stems won't recover and the black sections will just spoil the plant's appearance.
Once cleaned up, repot the plant, ideally into a fresh potting mix, but theoretically, you can reuse the old growing medium. Only very light watering is needed until the plant has reestablished itself properly.
Just make sure you understand why the root rot has started in the first place. Read the prevention pointers further down to try and stop it happening again.

For the best chance of recovery from root rot, trim off the affected roots and remove any diseased or damaged foliage.
Fixing a Moderate Level of Root Rot
At this level, the rot is pretty extensive and the plant's upper parts might look quite grim.
The steps needed here are likely to be a combination of the Minor fixes as covered above, with some more aggressive pruning of the rotten roots and any damaged upper parts of the plant.
You may want to wash off the growing medium so the roots are clear and can be accessed and seen fully. This will also help remove any harmful bacteria and keep things as clean as possible for the next steps.
How to fix root rot without repotting?
If the level of root rot is quite minor, you can re-use the same growing medium and container without doing a full repot.
However, if the root rot is quite bad, it's much riskier, and your plant has a far better chance of making it by using a fresh, clean potting mix.
When dealing with this level of rot, I'd advise not to reuse the existing potting medium. Chances are it's full of bacteria or the damaging fungal disease that lead to this position in the first place. Putting the weakened plant back into this growing medium could damage your plant further.
If you remove a lot of roots, it may be worth removing some of the upper green growth too. I'm talking about some of the healthy looking leaves and stems, (even if they're undamaged).
This is because the roots were supporting all of that foliage initially and now the root system has been compromised, so it may struggle to support the plant as it did previously.
Fixing a Severe Level of Root Rot
Most houseplants with this diagnosis don't have a great chance of making it. At least in their current form.
I've seen some people saying hydrogen peroxide can save your houseplants as if it's a dream elixir. Many studies on different plants show that using it can reduce fungi and bacteria in the soil that can cause root rot. It essentially acts like a bleach solution to eliminate microorganisms.
Where to buy?
Hydrogen peroxide is very common and sold in many stores. But if you want an Online source Amazon is as good as place as any (affiliate link).
This study showed using a 2% hydrogen peroxide solution completely inhibited fungal growth in the soil. Another study showed that hydrogen peroxide could help prevent damping off of seedlings in garden plants.
But these studies typically used hydrogen peroxide as a preventative measure, rather than a cure. I'm doubtful it can resolve and thoroughly treat root rot by itself when it's extensive, but you're welcome to try it. Even better if you combine it with my two tips for dealing with severe problems.
- Follow the Moderate instructions.
Follow the guidance above to try and save your plant. You don't have anything to lose at this point. To recap, trim off the decaying roots, and damaged foliage. Repot using a fresh potting mix and reduce the amount of foliage to compensate for the loss of the roots. If you want to, apply a weak (2% or less) hydrogen peroxide solution to the remaining roots. - Propagate new plants with any usable material.
There is a good possibility some parts of the plant can be successfully propagated. You lose the original plant (or what's left of it), but you'll have material to create replacements.
I've covered a few examples of this below and how I salvaged a few plants from my collection over the years that were affected by extreme root rot.

The entire entire root system was destroyed, but with a little time a brand new one was grown.
My Eve's Pin Cactus literally fell apart one day due to root rot that had progressed up into the base of the plant. I had no idea the decay was this bad and was horrified as sections just came away in my hand.
I left the sections to dry for a day so they calloused over. Then I pushed them directly into fresh soil. I used my own DIY Succulent Potting mix (which you can read about here) this has plenty of grit to keep it free draining. I barely watered it for several weeks and kept it in a bright location but out of harsh full sunlight.
Fast forward several months and all the "arms" or sections have rooted and I have a "new plant".

Improper drainage caused severe problems for one of my ZZ Plants. But I was able to rescue some of the stems and create a new plant.
A ZZ Plant suffered some root rot which again progressed to several of the stems. I removed them, cut off the rot at the bottom. After letting the raw edge dry for a day or so, I put it into a vase of water.
ZZ Plant's can grow slowly and it took six months for a root system to form around the base, but we still got there. Eventually. When the roots looked like those in the photo above, I moved it to a soil based growing medium and its since properly rooted and established.
Top Tip
If you have a plant where stem cuttings are not a viable propagation method, check out our propagation guide for further ideas you can try instead.
If I hadn't acted in the above two examples the original plants would be long gone. So even if things look pretty bad you can sometimes still rescue the legacy of the original plant.
No matter how things pan out, the best way to avoid being in this position is to try and prevent root rot from setting in to start with. Up next are a couple of pointers to help you with this.
Preventing Root Rot Issues
The easiest way to avoid any of the headaches caused by root rot problems is to prevent them from happening in the first place.
Unfortunately it's natural for almost all plants, including those in the garden to be effected by root rot and this applies equally to houseplants. So there is no certainty you can prevent it from ever happening.
We also all make silly mistakes as indoor plant parents that can make it much more likely. But you can significantly reduce the chances of dealing with it by adopting the following three points into your plant care.
Don't Overwater
Oh how straightforward and easy it is to say those two words. But of course, it's never as simple in practice is it
Understand that root rot is almost always caused when the potting medium is over saturated with water. It triggers a cascade of problems starting with a lack of oxygen (yes, plants need oxygen not just carbon dioxide).
I discuss this more in another article if you want to understand it in greater detail: called why do houseplants die in waterlogged soil?
But at its core, overwatering and poor drainage is the cause of root rot. Keep the roots of your houseplants from sitting in a waterlogged growing medium. As a starting point you need drainage holes in the planter to help create good drainage. If this doesn't make sense, or you're fairly new to indoor plants, check out "Am I Overwatering?".
Use Free Draining Soil Mixes
Heavy compact soils play a big part in root rot. They hold huge amounts of water and very little air. Even if you're trying your absolute best not to overwater your plants if the growing medium is behaving like a giant sponge you're going to run into issues sooner or later.
The goal is to prevent the growing medium from storing large volumes of water by replacing some of the absorbent material with objects that won't hold water, like perlite. A succulent potting soil can be used for succulents and cacti, but sometimes they can be suitable for other plants too.
You can buy specialist well-draining soil mixes, or even make your own. If you need some inspiration here are 10 things you can use for growing mediums.
Let Your Potting Mix Dry Out
It's true some houseplants should never be allowed to dry out, but these are pretty unusual. Most indoor plants should be provided with the required amount of water and then only watered again when more is needed.
This means giving time between waterings for the growing medium to dry out. How to work this out depends on many factors, from the plant to your growing environment. This is a vast topic, so look at "How Often Should I Water my Plants?" for a deeper understanding.
That's it for my houseplant root rot guide, I hope it helps. You should know what root rot looks like and how to fix it. If anything is unclear or you need more help, drop me a message in the comments.
About the Author
Over the last 20 years, Tom has successfully owned hundreds of houseplants and is always happy to share knowledge and lend his horticulture skills to those in need. He is the leading content writer for the OurHouseplants Team.